An icon is a small picture or symbol on a graphical user interface (GUI) that represents a program (or command), file, directory (also called a folder) or device (such as a hard disk or floppy). The term comes from the Greek word eikon, which means likeness, image or portrait.
A GUI is a user interface (i.e., a way of displaying things on a monitor screen) that uses windows, icons and menus and which can be manipulated by a mouse (or other pointing device, such as a trackball) in addition to (at least to some extent) the keyboard. This is in contrast to a command line interface (CLI), which uses text only and is accessed solely by a keyboard.
Icons were first developed in the 1970s at the Xerox Palo Alto Research Center (PARC) as a means of making computers easier for novices to use. Their first large-scale commercial application was on the Macintosh personal computer, which was introduced in 1984. Today virtually every major operating system employs icon-based GUIs.
Q-2 Explan rd and md command
ans:- Rd
The RD command removes a directory on the device, storage card, or the release directory on the remote desktop.
e.g.
c:\ rd xyz
Md
The MD command creates a directory on the device, storage card, or the release directory on the remote desktop.
e.g.
c:\ md xyz
Q-3 Defind my computer.
ans:- A computer is a programmable machine that receives input, stores and manipulates data//information, and provides output in a useful format.
While a computer can, in theory, be made out of almost anything (see misconceptions section), and mechanical examples of computers have existed through much of recorded human history, the first electronic computers were developed in the mid-20th century (1940–1945). Originally, they were the size of a large room, consuming as much power as several hundred modern personal computers (PCs).[1] Modern computers based on integrated circuits are millions to billions of times more capable than the early machines, and occupy a fraction of the space.[2] Simple computers are small enough to fit into mobile devices, and can be powered by a small battery. Personal computers in their various forms are icons of the Information Age and are what most people think of as "computers". However, the embedded computersfound in many devices from MP3 players to fighter aircraft and from toys to industrial robots are the most numerous.
Q-4 Explain property of taskbar
ans:- The easiest method of accessing the properties of the Taskbar is to right click on the Taskbar and select [Properties] from the context menu. The Taskbar and Start Menu Properties Property Sheet (Fig. UI-71) will open. The focus is on the Taskbar tab. The Property Sheet is divided into two sections that mirror the divisions of the actual Taskbar. The two areas are discussed below.

[Taskbar Appearance] - This area controls the center section of the Taskbar located between the Start Button on the left and the Notification Area on the right. The graphic at the top of this section will change to reflect the options selected or cleared.
[Lock the Taskbar] - The Taskbar can be positioned along the top, bottom, left, or right side of the desktop. Left click in any open area of the Taskbar and drag it to the desired location. Any changes you make to the Taskbar, including toolbars located on the Taskbar are locked and prevented from being moved with this selection.
[Auto-Hide the Taskbar] - Allows the Taskbar to retract to the edge of the screen when it’s not being used. To recall it to view, move the mouse to the edge of the screen where the Taskbar is positioned. Many users are hesitant to use this option but I suggest you give it a try. I personally expand the taskbar to two rows high in everyday use to accommodate more items with less side to side compression. The Auto-Hide feature reclaims this desktop space whenever the focus is on a program.
[Keep the Taskbar On Top of Other Windows] - Contrary to what this item description would indicate, when used in conjunction with the Auto-Hide the Taskbar option discussed previously, it simply ensures that when you move your mouse pointer to the edge of the screen the Taskbar will always become visible. It does not supercede the command to Auto-Hide the Taskbar by making it always visible.
[Group Similar Taskbar Buttons] - This is one of the best new features of XP for anyone who works with multiple open windows. The grouping occurs in two ways. First, it displays files opened by the same program in the same area of the Taskbar. For example, if you opened, in order, the following files: Excel 1, Word 1, Excel 2, and Word 2, normally the files would be displayed across the Taskbar in that same order. With grouping enabled, the order would be Excel 1, Excel 2, Word 1, and Word 2. In addition, if the size of the Taskbar windows falls below a certain width due to the Taskbar being crowded, grouping combines all the similar program files into expandable buttons containing the individual files. Having the files grouped by the parent program also allows you to close the entire group by right clicking the button and selecting [Close] rather than closing each file individually.
[Show Quick Launch] - Way back in 1988 Robert Palmer did a song titled “Simply Irresistible.” That pretty much sums up my feelings about Quick Launch. It resides over on the left side of the Taskbar (although you can drag and position it anywhere you want), is fully customizable and launches programs with a single click. Programs can be added to Quick launch by dragging and dropping. The minimum size for Quick Launch is the width of three icons. Icons over three (six in my case since I use a double height Taskbar) are accessible from a pop up listing by clicking on the [>>] symbol.
[Notification Area] - This area controls the far right section of the Taskbar adjacent to the edge of the screen where the clock is located if you have it activated. The graphic at the top of this section will change to reflect the options selected or cleared.
[Show the Clock] - Check the box, you have a clock. No check, no clock. Simple.
[Hide Inactive Icons] - The Notification Area has always been one of my pet peeves. Programs have a tendency to stick icons here on a regular basis. This is fine if they provide a simple way of turning them off, the most common method being via right click and context menu selection for disabling. Some icons in this area are truly useful. The bad part was the way they string across the taskbar with each new addition. The Hide Inactive Icons name only tells part of the story. While it is true that it will hide the inactive icons, it goes well beyond that function by selecting the [Customize...] button. The [Customize Notifications] (Fig. UI-72) dialogue box will open.

[Customize Notifications] - This dialogue box displays a list of Current Items and Past Items that have appeared in the Notification Area. Click on any item in either section and a drop down box will appear with three options.
[Hide When Inactive] - The default choice. Useful for items that you want to become visible when they have information to report.
[Always Hide] - A good choice for items you want to run in the background but don’t want a notification until you make the choice to expand the Notification Area.
[Always Show] - Useful for items which you want to monitor for both activity and inactivity so they are always available at a glance.
With the modifications that are possible to the Taskbar in Windows XP I’ve pretty much eliminated any need for the Start Menu on a regular basis. By carefully constructing the Taskbar, adding the programs that are most relevant to my work in the Quick Launch area and utilizing the Notification Area and Auto-Hide functions wisely, I’m able to increase available screen real estate and maintain access to essential programs and monitoring functions.
Q-5 How to change desktop background
ans:-
- Step1
Click on the Start menu button. Then click on Settings and then on Control Panel.
- Step2
Double-click on the Display icon or text link. This will open a window named Display Properties.
- Step3
Click on Background if that tab is not selected. Click on one of the items that appear in the box labeled Wallpaper.
- Step4
Inspect the preview that appears above the Wallpaper menubox. Use the Display menu to the right to experiment with tiling, stretching or centering the picture that you are previewing.
- Step5
Click on Browse to use an image stored elsewhere on your hard drive. Locate the image and click Open.
- Step6
Click OK to change your background, or wallpaper. Click Cancel if you decide to maintain your current settings.
Q-6 short not desktop
ans:- A desktop computer is a personal computer (PC) in a form intended for regular use at a single location, as opposed to a mobile laptop orportable computer. Prior to the widespread use of microprocessors, a computer that could fit on a desk was considered remarkably small. Desktop computers come in a variety of types ranging from large vertical tower cases to small form factor models that can be tucked behind anLCD monitor. "Desktop" can also indicate a horizontally-oriented computer case usually intended to have the display screen placed on top to save space on the desktop. Most modern desktop computers have separate screens and keyboards. Tower cases are desktop cases in the earlier sense, though not in the latter. Cases intended for home theater PC systems are usually considered to be desktop cases in both senses, regardless of orientation and placement.
History
Early computers took the space of a room. Minicomputers generally fit into one or a few refrigerator sized racks. It was not until the 1970s when computers such as the HP 9800 series desktop computers were fully programmable computers that fit entirely on top of a desk. The first large calculators were introduced in 1971, leading to a model programmable in BASIC in 1972. They used a smaller version of a minicomputer design based on ROM memory and had small one-line LED alphanumeric displays. They could draw computer graphics with a plotter. The Wang 2200 of 1973 had a full-size CRT and cassette tape storage. The IBM 5100 in 1975 had a small CRT display and could be programmed in BASIC and APL. These were generally expensive specialized computers sold for business or scientific uses. By the late 1970s and 1980s personal computers such as the Apple II series and the IBM Personal Computer used standard processors to reduce cost to put a complete computer on top of a desk with a separate monitor. These would find uses in the home as well as in business and industry, and later incorporate graphic user interfaces and powerful networked operating systems such as Mac (Macintosh) and Windows
.Q-7 How to arrange icon on a desktop
ans:-
Arrange your desktop icons
The simplest way to rearrange the icons on your desktop is to simply drag and drop them. You can drag an icon to any location on your desktop.

However, dragging and dropping your icons can lead to icons not aligning in even columns and rows. If you’d rather have neat columns and rows of icons, you can have Windows automatically arrange them for you. Simply right-click your desktop, click Arrange Icons By, and then click Align to Grid. Windows XP does not immediately move your icons. However, the next time you drag an icon, Windows XP will automatically place it into an orderly row.

To automatically arrange your icons into rows without changing their order, right-click your desktop, click Arrange Icons By, and then click Auto Arrange. Windows XP places your icons into neat rows.

Q-8 How to create folder on desktop
ans:-
First Method

- Right click on an open area of your desktop, or in an open area of Windows Explorer.
- Then left click New
- Then left click Folder.

Once your folder appears either on your desktop or in Windows Explorer you will notice that the folder name is highlighted. This is giving you the opportunity to name your folder. It is always best to give your folder a very memorable name that accurately describes its contents.
- Type in the name you want to give to your newly created folder, and then hit Enter to complete the process.
Second Method
This method is for use in Windows Explorer only.
- Open up Windows Explorer ((Hold down the Windows Key and press E) or left click Start/Programs/Accessories/Windows Explorer)
- Navigate to the place you where you want your new folder to be created.
- Then from the top toolbar click File
- Then left click New
- Then left click Folder

Once your folder appears either on your desktop or in Windows Explorer you will notice that the folder name is highlighted. This is giving you the opportunity to name your folder. It is always best to give your folder a very memorable name that accurately describes its contents.
- Type in the name you want to give to your newly created folder, and then hit Enter to complete the process.
Third Method
This method can only be used by Windows XP, and Windows 2003 users.
- Open My Computer ((Left click Start/My Computer) or double click the My Computer icon on your desktop)
- Navigate to the place you where you want your new folder to be created.
- Then left click Make a new folder from the File and Folder Tasks menu in your Common Tasks toolbar.

Once your folder appears either on your desktop or in Windows Explorer you will notice that the folder name is highlighted. This is giving you the opportunity to name your folder. It is always best to give your folder a very memorable name that accurately describes its contents.
- Type in the name you want to give to your newly created folder, and then hit Enter to complete the process.
Q-9 what is computer explorerans:-A section of Microsoft Windows that was introduced with the release of Microsoft Windows 95 and included with all versions of Windows after that. My Computer allows the user to explore the contents of their computer drives as well as manage their computer files. To the right, the top image is an example of the My Computer icon in Microsoft Windows XP. With the introduction of Windows Vista, Microsoft changed the traditional My Computer icon to Computer, the bottom image to the right is an example of what this icon looks like. Although the name has changed this icon still acts identical to the earlier My Computer.How to open My computer
- Get to the Windows Desktop.
- Double-click the My Computer icon, this icon is almost always located on the top-left portion of the desktop and should look similar to the icon above. Below are two examples of what should appear when My Computer is open. If this icon is missing see document CH000927.
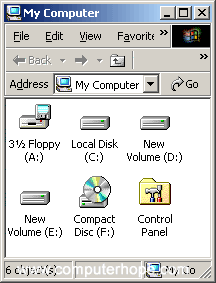
Drive listing in My Computer
Browsing My Computer in Windows 2000Using My Computer
Once My Computer is open you'll see all available drives on your computer. For most users you'll only be concerned with the Local Disc (C:) drive. This is your hard disk drive and what all your files are stored on. Double-click this drive icon to open it and view of its contents.
 If you're looking for a document such as a word processor file you've created, music file, picture, or other personal file it's likely that it's contained in your documents folder. This folder is displayed in My computer as a folder and usually contains your name. For example, if your username was John, this folder would be named John's Documents.
Finding files in My Computer
If you're having trouble finding where one of your files is stored use the Windows find feature to quickly find the file. To do this from within My Computer either click on File and then Search or right-click on the C: drive or other folder you wish to search and click Search.
In the Search window type the name or part of the name of the file you're looking for.
Adjust system settings with your computer
If you wish to manage your computer and/or view other settings and information about your computer instead of double-clicking the My Computer icon to open it, right-click on the My Computer icon and click Properties. Performing these steps will open your System Properties (the same window accessible through the Control Panel).
Q-10 what is print manager?
ans:-
Print management can have many definitions. It can be best described as controlling, maintaining and monitoring a printing environment and its productivity levels. Generally, an administrator who engages in print management can manage all the printers on his network. He is provided with real-time status updates on printers and the network on which they operate. In essence, he can manage numerous printers and their environments from one computer. If the administrator were not engaging in printer management activities, he may have to tend to each computer individually.
Printing management is meant to provide companies and organizations with the tools to make the most of their resources. Space, hardware, software and time — as with deadlines — are all considered when attempting to streamline printing operations. Business owners may choose to outsource their printing management activities and heed the advice of professionals who supply printing management services. For example, a third-party printing management service may assess a company's printing processes and offer suggestions like hardware and software upgrades, the relocation of equipment or the addition of an employee to increase productivity.
Reports provided by basic print management activities can aid an administrator in keeping on top of what is happening in his printing environment. If an administrator identifies activities that he thinks may contribute to a problem later on, he may take steps to change those behaviors in the printing environment. For instance, an administrator who notices paper being wasted may impose printing limits or require that users utilize options that allow for double-sided printing.
Print management can also help an administrator in their troubleshooting efforts. Notifications and scripts can be remotely sent through the system to address problems. These problems may range in scope from simple toner and paper changes to system failures. Since small issues are caught before they turn into bigger ones, the need for major technical support can be reduced.
Besides streamlining operations, printing management can help in saving money and increasing productivity for a company or organization. For example, beneficial print management activities include those that reduce waste and minimize the amount of repairs required to keep a printing environment operational. To truly experience the benefits of print management, changes will have to be made according to a business's specific needs.
No comments:
Post a Comment